February 26, 2024
Even though ES6 is still not widely supported, by using tools like Babel.js, Webpack and Gulp we can write modular and structured future proof code — today.
When you dig deep into the client-side development, one of the biggest problems that emerge is how to make your JavaScript modular. Of course, there are patterns like Revealing Module Pattern or Sandbox Pattern that can help you organize your code in a more modular manner, but you are still aware that these are not real modules and that something is missing.
JavaScript ES6 has introduced concepts of modules that can be exported and imported anywhere in your application. It seems like we are in luck, ES6 can solve our problem with writing modular and maintainable code. But don’t rush with conclusions. ES6 is still not very widely supported and using something that experimental can give you more headaches than benefits. This is where Babel.js comes in.
Babel.js is commonly known as JavaScript Transpiler. Transpilers (as their name states) translate your ES6 code into ES5 compatible code so it can be supported on every widely used browser. This means you can use new ES6 features like lambdas, classes, etc. and Babel.js will handle the compiling to ES5 equivalents. There are also Babel.js alternatives as Traceur or even “language superset” as TypeScript, but Babel.js supports more ES6 features than its counterparts and you are still writing traditional JavaScript.
At the time of writing this post, Babel community released version 6 which offers new possibilities and more importantly, separates different tools in standalone packages. OK, we’ve covered our future proof part of the title, but still we need some glue to hold things together. We still don’t know how to use this fancy ES6 features in our live project.
The easiest term to describe Webpack is module bundler. That means that Webpack takes all your modules and bundles them in a single output file commonly known as bundle.js. Webpack gives you the ability to use almost every NPM module in your frontend project. Tools like Browserify have brought the ‘’use NPM module in the browser’’ idea, but Webpack has expanded it.
As Babel.js, Webpack also has a specific set of tasks that needs to be run to bundle everything together. Webpack has its own toolkit for accomplishing this, but as popularity of Gulp grows and grows (even though Grunt is still very widely supported), we will try to integrate it into our build process.
If you did some JavaScript/Frontend blog reading lately, you may have noticed some titles like “Gulp VS Grunt” or “Gulp – your new task runner”. Also, if you look at some new tutorials or Github examples, there frequently is a Gulpfile.js in the project. The main difference (or benefit) of Gulp over Grunt is that offers simpler, “developer oriented” methods for task automation. If you already have your projects well configured on Grunt, you have no need to switch to Gulp. But if you are starting a brand new project, you should consider what task runner to use.
We will start by examining a simple use case that we can optimize using mentioned tools. Here at Degordian, we have to often reuse our common components such as slider, image galleries or video preview. Also, for many of our projects, who rely heavily on presentation and are not classic web applications, we do not have so many javascript dependencies besides jQuery and some additional plugins. Often we need to use our, sometimes rather simple code, as a component in a much larger, structured web application.
I will present a glimpse of some problems that we must solve before digging deeper into the Webpack build process. This blog post will try to describe only the crucial parts in component-based development, for the entire codebase visit Github project.
The main idea here is to have each component doing only one thing very well. In the programming community this pattern is commonly known as separation of concerns.
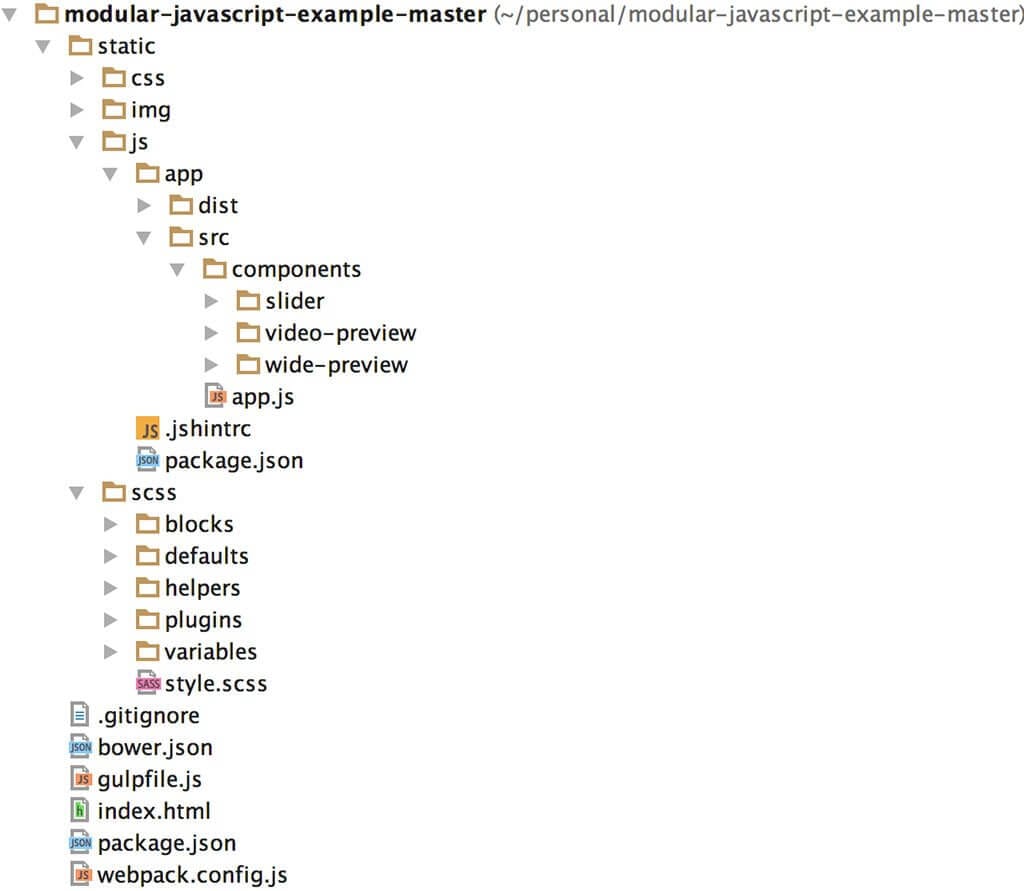
First of all, we will start with the main application’s ‘’skeleton’’. Our main app directory has two subfolders. First one, dist, will contain the final, bundled output that we can directly embed on our website. Source folder (src) is where all the fun starts. Here we have a subfolder for each component that we will use in our application. This way, we have organized our app in a more structured manner so that every component can simply be added or removed. Also, here at Degordian, we try to separate our styling from our logic and we have an additional SCSS subfolder that contains the entire styling. It is very important that every component has its own .scss counterpart for styling so it can be easily embedded in the final CSS style.
The first step in configuring our environment is to install all required packages. As Babel changed his philosophy to a more distributed way, our package.json has more dependencies than with the older Babel version.
Babel-loader is an addon for combining Babel transpiler with Webpack module bundler. Also, when bundling a large amount of code with Webpack, Babel can have some code redundancy so we can use babel-runtime and babel-plugin-transform-runtime to filter unnecessary Babel helpers and to reduce file size.
Every webpack bundle needs to have an initial webpack.config.js file where we define what loaders we are going to use and an output file for our new bundle. At least we define additional plugins, like new webpack.optimize.UglifyJsPlugin({minimize: true}) for output code minimisation. In our webpack config we must specify what loaders we want to use. You can think of loaders as ‘’Webpack add-ons’’ that extend basic Webpack functionality. In our case we will need Babel loader for Babel transpiling and HTML loader for embedding html templates directly in our components.
We will try to write a simple slider component that has all the elements of a common component such as template, configuration and external dependencies. Structure of a simple component contains a JS file with component logic and a HTML template.

Our HTML template contains only HTML containers and elements that are required for our components. Notice that here we have links to images and that is why we use query flag ?attrs=false in Webpack config file to exclude images and outside resources from HTML loader processing.
The more interesting part of our component is the JS file where we declare and export our module. Every module needs to import required dependencies. Every dependency is a NPM module and by using Webpack, we can utilize every NPM module in a client side JavaScript. After importing required dependencies, we need to declare our module as a Javascript class. Then we declare component specific methods and return this object so we can have a jQuery-like method chaining. At the end of our module we must export it using ES6 export syntax.
The last step in our workflow is to init our component and configure basic functionality. We can import all of our components in a central app.js file and invoke every one of them.
That is all there is in defining and using component base principle in client-side development. Of course, there are some limitations in terms of SEO because we are injecting our HTML content dynamically, but we can use static html templates or serve precompiled versions of HTML documents.
Writing Javascript components gives us the ability to reuse our code inside multiple projects. Also, by using tools like Webpack or Babel we can utilize new programming principles and maintain a clean code base of our project. Besides the standard use case that we’ve presented here, we can use Webpack and Babel in writing Angular or React applications in a more modular manner. As an example of an Angular project combined with Webpack and Babel, you can use an earlier project of mine located on Github.
This blog post was a basic intro to Webpack configuration and possibilities. Webpack can be extended with multiple available loaders and can become a central tool in frontend development.